If you have chips, stubborn stains, or small gaps that keep showing up in photos, veneers can feel like a straightforward fix. Understanding What to Expect During a Dental Veneer Procedure in Yorba Linda, CA helps you plan for visits, comfort, timing, and aftercare with fewer surprises. This guide walks through veneer types, each clinical step, and the practical details that matter most before you commit.
Overview: What Veneers Are and What They Can Fix
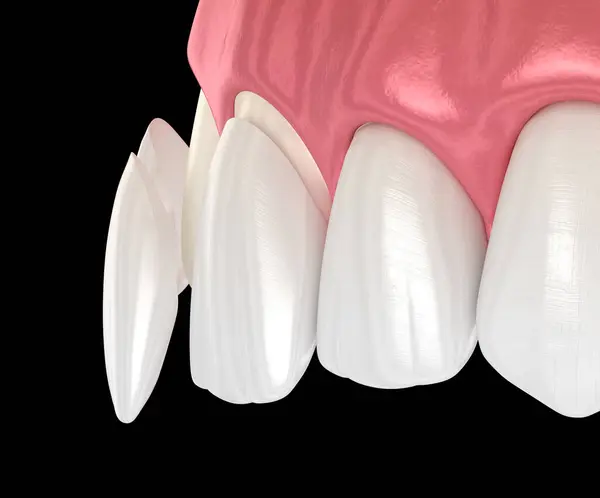
Dental veneers are thin shells bonded to the front of a tooth to change the visible surface, including color, shape, and edge position. They are a cosmetic dentistry option designed to improve appearance while preserving as much natural tooth structure as possible.
Veneers commonly address chips, gaps, discoloration, stains, minor misalignment, and uneven shape or length. Results can look very natural when shade matching and smile design are planned carefully.
It helps to keep expectations realistic. Veneers can camouflage mild crowding, but they do not move teeth like orthodontics, and they are not a substitute for treating tooth decay, fractures, or advanced wear that needs restorative dentistry.
Benefits and Limitations to Know Up Front
Benefits include a natural appearance, improved smile symmetry, and strong color control when you want brighter teeth without the “too white” look. Veneers can also create a more even smile line by adjusting tooth length and edge shape.
Limitations matter just as much. Many cases involve irreversible enamel reduction, and veneers are not ideal if you have untreated cavities, active gum issues, or severe bite problems that increase fracture risk.
Step 1: Consultation, Exam, and Smile Planning
Your first visit is usually a consultation and examination focused on goals, photos, and a timeline overview. You will also discuss shade selection, what you like about your smile, and what you want to change.
A comprehensive oral examination typically includes checking gum health, enamel thickness, bite evaluation, existing restorations, and screening for cavities or tooth decay. This is where a dentist determines whether veneers are appropriate or whether other care should happen first.
Treatment planning usually ends with a clear plan: how many veneers, whether porcelain veneers or composite veneers make more sense, and a realistic estimated cost range. At Dentique Dental Studio in Yorba Linda, CA, this planning is supported by modern technology and a patient-centered approach that prioritizes comfort and clarity.
Candidacy Checklist Your Dentist Will Review
A dentist will confirm that gums are healthy and any decay is controlled before bonding veneers. Veneers rely on a stable foundation, so inflammation or untreated cavities can undermine results.
You will also be screened for bruxism and clenching, since heavy bite forces can shorten veneer lifespan. If risk is present, planning may include a night guard and bite adjustments to protect your investment.
Shade Selection and Smile Design Details
Shade matching is usually done under operatory lighting, then verified with natural-light checks so the color does not shift outside the office. This is especially important when blending veneers with neighboring teeth.
Smile design details often include tooth length, edge shape, midline alignment, and how the smile line follows your lower lip. Small choices here are what keep veneers from looking bulky or overly uniform.
Step 2: Tooth Preparation and Impressions (or Digital Scans)
Tooth preparation typically involves minimal shaping of enamel to create space for the veneer and improve bonding strength. The goal is a seamless transition at the edges so the veneer does not look or feel like an add-on.
Many patients receive local anesthesia during preparation, especially when enamel is being reduced or if a tooth is sensitive. Numbing keeps you comfortable and helps the dentist work precisely without rushing.
For records, your dentist may take traditional impressions or use an intraoral scanner to capture digital impressions. Scanning is often more comfortable for patients who dislike impression trays, and it can be highly accurate for veneer fabrication.
How Much Enamel Is Removed and Why It Matters
Most veneers require removing a thin layer of enamel, but the amount varies based on alignment, desired shade change, and final contour. Minimal-prep veneers may be possible when teeth are well positioned and only small changes are needed.
Not everyone is a no-prep candidate. Preparation affects veneer thickness, translucency, and long-term retention, and it can help avoid over-contoured results that irritate gums or trap plaque.
Temporary Veneers (When They’re Used)
Temporary veneers are sometimes optional for very conservative cases, but they are often recommended for aesthetics, sensitivity control, and protection between visits. They also let you “test drive” length and shape before final bonding.
Temporaries can feel slightly different, and your bite may feel mildly off until final placement. Avoid very sticky foods and be gentle with flossing so they do not dislodge.
Step 3: Veneer Fabrication and Final Placement
If you choose porcelain, a dental lab typically completes veneer fabrication after receiving scans or impressions. The lab customizes shape, shade, surface texture, and translucency so the veneers mimic natural enamel.
At the try-in appointment, veneers are placed without final cement to check fit, contacts, bite, and color. This is the moment to confirm you like the brightness and the way the edges look in your smile.
Bonding is a multi-step process that includes etching the tooth surface, applying a bonding agent, placing dental cement, and using light curing to harden the materials. Final polishing smooths margins and refines shine so the veneers blend with surrounding teeth.
Bonding Day: What You’ll Feel and How Long It Takes
Bonding day usually follows a predictable flow: isolation to keep teeth dry, step-by-step bonding, curing, then polishing. Total time depends on the number of veneers, but more units generally mean a longer appointment.
Before you leave, your dentist checks flossing through contacts, verifies speech and comfort, and performs any needed bite adjustment. These checks help prevent premature chipping and reduce the chance of sore jaw muscles.
Immediate Aftereffects: Sensitivity and Bite Awareness
Mild tooth sensitivity to cold or pressure can happen, especially in the first few days. Call the office if sensitivity is sharp, worsening, or paired with lingering pain.
Bite awareness is also common because your brain notices small changes quickly. Minor bite adjustments can make a big difference in comfort and can protect the veneer edges from excess force.
Aftercare, Longevity, and Common Mistakes to Avoid
Daily care is simple but important: brush and floss consistently, choose a non-abrasive toothpaste, and keep routine dental cleaning visits. Veneers can still get plaque around the margins, so gum health remains a priority.
Longevity depends on material choice, bite forces, hygiene, and habits like bruxism or clenching. A night guard is often the most practical way to protect veneers if you grind at night.
Common causes of failure are preventable. Avoid nail biting, ice chewing, using teeth as tools, and skipping protective appliances your dentist recommends.
Eating and Drinking Guidance (First 48 Hours and Beyond)
Right after bonding, stick to softer foods and avoid very hard or sticky items so you do not stress the new margins. If anesthesia was used, be careful with hot drinks until numbness wears off to avoid burns.
For composite veneers, stain risk is typically higher, so limit frequent exposure to coffee, red wine, and tobacco, and keep up with polishing as advised. For all veneers, good hygiene protects the edge where veneer meets tooth.
When Repairs or Replacement Might Be Needed
Watch for edge chips, a rough spot, persistent gum irritation, or a veneer that feels loose. These signs can indicate a contact issue, bite problem, or debonding.
Small composite defects are often repairable, and minor polishing can smooth roughness. Porcelain chips or significant debonding more often require replacement, depending on damage location and fit.
Timeline, Costs, and Local Logistics in Yorba Linda, CA
A common timeline is consult, then prep and scan, then lab time, then placement, followed by a short follow-up for comfort and bite. Some composite cases may be shorter, while porcelain cases usually include a lab interval.
Cost is driven by the number of veneers, material selection, tooth preparation complexity, dental lab fees, and any adjunct treatment like treating cavities first. Insurance coverage is often limited because veneers are typically classified as a cosmetic procedure, but patients may use FSA or HSA funds when eligible, and many offices offer financing options.
If you are coordinating other family dental needs in Yorba Linda, CA, these resources may help with planning: essential guide to children dental cleanings in yorba linda ca at dentique dental studio and the importance of regular children dental cleanings in yorba linda ca for preventing cavities and gum disease early.
Next Steps For Patients in Torba Linda, CA
A veneer case goes smoothly when the foundation is healthy, the design is planned, and the bite is protected after placement. If you want a predictable cosmetic result in Yorba Linda, start with a thorough consultation and examination, ask specific planning questions, and commit to aftercare that keeps gums and margins clean.
If you’re ready to enhance your smile with dental veneers, our team is here to help every step of the way. Call us today at 714-986-1699 to schedule your consultation, or visit Dentique Dental Studio to learn more about your options and book an appointment online. Your confident, radiant smile is just one visit away!